
Most inexperienced audio artists ponder the question – is GarageBand good for a voice-over?
Whether you’re recording your voice for a voice-over, a podcast, or you’re creating a vocal track for the new song you’re producing, GarageBand remains an excellent choice as your digital audio workstation.
It’s pretty easy to record your voice on GarageBand – but making it sound fantastic is a little more challenging. No worries, though. I’m here to assist you in learning how to record your voice in GarageBand and make it sound amazing.
I know what you’re thinking – how do I make GarageBand audio professional?
The truth is, you have to know a few basic things about settings and how to adjust them to get the best voice-over.
So, if you’re interested in the best GarageBand settings for voice-over, keep on reading.
Let’s dive right in!
Getting Started: How To Use GarageBand For Voice-Over?
Once you’ve opened GarageBand, a gray window will pop up. Since you want to record a vocal narration, the next step would be to click on the silver microphone icon labeled “Voice.”
When you’ve selected a project, you’ll see the following four icons in the far left corner of the GarageBand window:
- Library
- Quick Help
- Smart Controls
- Editor’s Button
Click on the Library icon, and on the far left side, you will see a library of “Sounds” separated into three categories:
- Vocal
- Acoustic Guitar
- Editor’s Button
Here, you should click on the “Vocal” category. After this, you’ll see a list of various voice filter options. You want the number 7 on the list – or the “Narration Vocal,” to be more specific.
While you’re at it, don’t forget that you’ll have to connect a separate microphone – in case you’re not using your computer’s built-in mic, that is.
This process is rather simple:
On the Toolbar, click on the GarageBand tab and select “Preferences.” You’ll see an Audio/Midi icon. Click on it, and you should see two drop-down bars under “Devices.”
“Input Device” allows you to select the mic GarageBand will use for new recordings. That said, if you have already plugged in your mic, the tool will recognize it automatically.
The million-dollar question here is, how can I make my voiceover sound better? So, let’s move on to that.
How To Make Your Voice-Over Sound Great
If you’re wondering, “How can I make my voice-over sound better?” pay special attention to this next part!
Let’s start with a few tips from experts:
- Put the microphone in the right place
Start by placing the microphone 8–12 inches away from your mouth – but directly in front of you. That’s close enough for the voice to sound clear and “present,” yet far enough for the microphone’s proximity effect to prevent the speech from turning out muddy.
- Make sure the recording space is not too lively
It’s simple to add reverb or roominess to a dry vocal – but it’s much more challenging to remove room ambiance from a recording. Acoustic filters can make a massive difference in the sound of your voice when you’re recording in a large room with reflective walls compared to a professional vocal booth.
- Remember that speaking isn’t the same as talking
Speaking into a microphone isn’t the most natural thing in the world.
When you communicate with another person, you use not just your voice but also your facial expressions, body language, and gestures – all of which are difficult to convey in voice-overs. Speak clearly to ensure that each word is understood.
That’s cool and all, but now another question probably popped in your head:
How do I make my voice sound better on GarageBand?

You can use numerous effects to enhance your vocals, including built-in presets and a large assortment of effect plug-ins you can use on all your tracks.
To make your voiceover sound better, try this:
Open your GarageBand audio.
To add one of the effect plug-ins to your vocals, go to the “Edit” tab. The compressor and Noise Gate plug-ins will be visible. To hear the plug-ins, turn on the little LED light next to them.
Select a preset from the drop-down menu – or click the compressor plug-in to modify it yourself.
For milder compression, set the ratio to 2:1. And for stronger compression, set it to 6:1.
The volume level at which compression begins is known as the threshold. To compensate for the volume loss caused by it, remember to use the gain control.
Adjust the gate level in the Noise Gate plug-in by shifting the slider; any noises below a certain volume are removed with this effect.
That eliminates sounds such as clicking, breathing – and any other background noise.
It’s generally advised that you keep this at a low setting because raising it too high may cause your voice to become too quiet – or perhaps disappear entirely.
Since this feature enhances the noise level and pulls out the quiet noises in the audio, you should use it after applying compression to your voice.
Is GarageBand Good For Podcasting?
When it comes to podcasts, GarageBand is more than suitable – and don’t let anyone convince you otherwise.
In fact, GarageBand is based on the same set of core features as, for example, Logic. You just have to know how to get the most out of these features and make your podcasts sound amazing.
My first piece of advice would be – use Smart Controls.
Smart Control is GarageBand’s plug-in interface. You’ll find the button on the Toolbar – it’s supposed to look like a control dial, by the way.
If you want your podcasts to sound great, apply a basic set of plug-ins to achieve the desired level of quality.
The good news is – you can adjust the setting only once and save it as a pre-set so that you can apply them quickly the next time around.
The first step is to add a compressor. Set the Compressor Threshold to -17.0dB, Ratio to 3.1:1, Attack to 9ms, and Gain to 7.0dB.
Click the “Save As” button next, and save the compression settings. Make sure to name it accordingly, though – something along the lines of “Podcast Vocal.”

The next plug-in is Channel EQ. Keep in mind that setting a great EQ is not that simple. Most podcasters recommend trying the following approach:
The Voice → Speaking Voice Improve preset that ships with GarageBand.
If things get too confusing, you can always deactivate this plug-in.
You should also add a noise gate that’s useful in masking background noise when someone isn’t speaking.
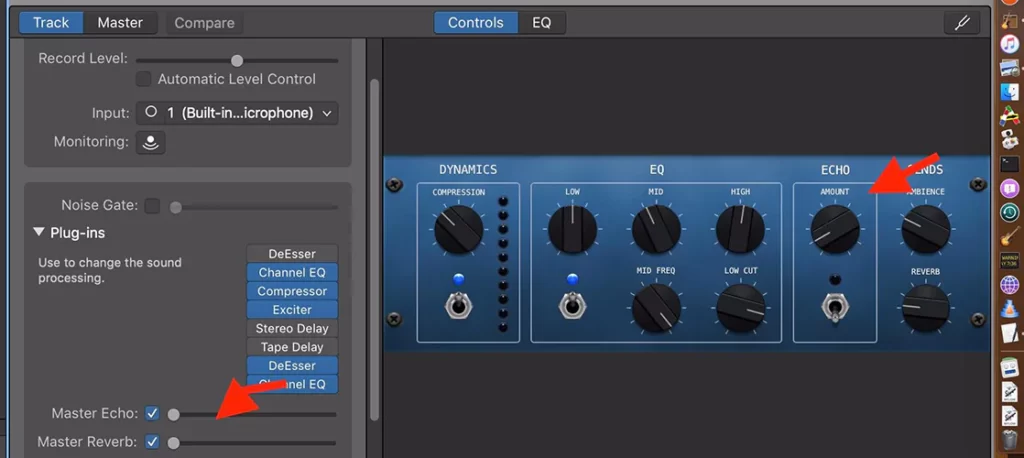
Above the plug-ins area, you’ll notice an inactive Noise Gate check box and slider.
That should be set to -35dB.
Lastly, several GarageBand presets turn on reverb. It’s not something you want, though, since it gives the impression that you’re in an echo chamber.
So, make sure the “Master Reverb” and “Master Echo” sliders are all the way to the left – meaning they’re off.
Conclusion
And there you have it, folks!
Although making your voice-over sound great isn’t exactly rocket science, you still have to have basic knowledge of the tool you’re working with so that you can get the best end result.
The good news is that GarageBand is reasonably easy to master – and you should be able to create epic voice-overs in no time!